Dear visitors to the site “”, today we will figure out how to make tracks for a tracked all-terrain vehicle yourself and what is needed for this? Let's go... it is the most passable among its brothers, and all because the specific pressure on the ground is evenly distributed over the entire lower plane of the caterpillar, that is, it is a uniform support point. But on wheeled all-terrain vehicles, the pressure is distributed over 4 points, so they often get stuck and slip. A simple example for you, why are tracked tanks? Yes, all for the same reason, to evenly distribute the huge weight of the machine onto the plane of the caterpillar in contact with the ground, otherwise they will simply get stuck in the ground and not budge.
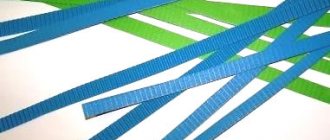
The first step is to get a conveyor belt, it looks like this. You will also need a corrugated pipe of rectangular cross-section. And of course fasteners in the form of: bolts, nuts, washers, engravers. First, we make track blanks according to the width of the track being made, saw them with a grinder and put them in a pile) After which these blanks need to be given the desired shape and pressed on a special homemade machine. For clarity, let's see how a professional does it; 40 seconds to crimp one track is no joke guys)
It is advisable to lubricate the ends a little with used oil. After the track has been given the correct shape, you still need to weld the fangs onto it. In the upper part, additional reinforcement is welded in the form of the letter “ V”
“In general, such a track should turn out. First you need to check and adjust directly at the installation site of the caterpillar itself.
Then you can start assembling the caterpillar, but first you need to make holes in the conveyor belt; basically, a homemade tool like this is used. The tube is sharpened at the end, and there is a hole on the side for removing chopped rubber. The tracks are also drilled with a drill, 2 holes on each edge. Next, we assemble the caterpillar into a single whole. This is how homemade tracks for all-terrain vehicles are made; as you can see, it is quite possible to do it yourself, which will significantly reduce the cost of the all-terrain vehicle you are assembling.
Thank you all for your attention!
Many people involved in the manufacture of homemade equipment also develop crawler-mounted all-terrain vehicles and homemade tracks for walk-behind tractors. When bringing this idea to life, people use a variety of solutions. But making tracks remains a big problem for fans of this type of transport.
After all, if an all-terrain vehicle or snowmobile is made with your own hands, then the tracks must be homemade.
How to make homemade tracks on a walk-behind tractor
Here we will look at several ways to make tracks with your own hands, with good performance characteristics.
The simplest version of homemade caterpillars
For light all-terrain vehicles and snowmobiles, tracks can be made from a conveyor belt and a bushing-roller chain. To make such tracks, you don’t have to own a special tool; everything can be done “on your knees.”
To extend the service life of the tape, it is necessary to stitch it along the edges with fishing line, observing a step of 1 centimeter, which will protect the tape from fraying. To connect the ribbon into a ring, you can sew the ribbon at the ends, or use a hinge.
When choosing the thickness of the tape, you should proceed from the engine power. If you use engines from domestic motorcycles, it is enough to take a tape 8-10 mm thick, used on conveyors in agriculture.
This DIY snowmobile track has a good service life and can be easily repaired if necessary.
Stage one
Draw it yourself or print out the caterpillar pattern on paper. If desired, the pattern pieces can be enlarged or reduced to the desired size. My caterpillar is 15cm in diameter. (download the full version of the pattern by clicking on the image on the right)
Next, we cut out the details of the head and body from fleece in different colors. The shoes on my paws are the same color as the rings, but this is not important. The back of the body is sewn in the same way as the head. The length of the legs, horns and tail is determined experimentally. Keep in mind that the longer the horns, the more difficult it is to make them “stand” without wire. If I were sewing the caterpillar a second time, I would shorten the length of the horns and tail by about a third. Otherwise, the filler “settled down” quite quickly and the horns stopped sticking out.
You can download the full-size template for printing by clicking on the thumbnail image on the right.
Homemade caterpillar for motorized towing vehicle
It is very common among DIYers to make tracks using car tires. For this purpose, tires with a suitable tread pattern are selected from trucks.
To make such a caterpillar, you need to cut out the sides from the tire and leave the treadmill. This is quite a labor-intensive job that requires a lot of patience, because the tool used is a sharpened shoe knife.
To make the work easier, from time to time the knife blade can be moistened in a soap solution to cut the rubber faster. One option is to use a homemade cutting jig, or use a jigsaw with a fine-tooth file.
After cutting off the sides, if the track is too hard, you can remove the extra layers of rubber inside the resulting ring. If the tread pattern is not suitable for the conditions of use, then a new lug structure is cut.
The undoubted advantage of a homemade caterpillar made from a tire over a caterpillar made from a transport belt is that it is initially a closed loop, and therefore reliable. The disadvantage of this caterpillar is the limited width of the workpiece, which can be corrected by using a double-width option.
Belt tracks
This version of making a caterpillar is attractive for its relative simplicity. To do this, you need to connect belts with wedge-shaped profiles into one whole with screws or rivets, using lugs attached to the belts.
To make holes for the drive sprocket in such a track, you need to make gaps between the belts. You can find many ways to make caterpillars with your own hands - the main thing is to have patience, desire and perseverance - then everything will work out.
Making caterpillars from car tires
You can make your own caterpillar using car tires. To carry out the work, you need to select tires borrowed from trucks; it is recommended to use a suitable tread pattern, and you will spend less effort when working with the tire. The manufacture of such a caterpillar must be done by cutting out the sides from the tire, while leaving space for a treadmill. It is worth considering that this work is quite labor-intensive and requires the application of a lot of patience and effort; you must use only a well-sharpened shoe knife.
In order to spend less effort when making a caterpillar for a car with your own hands, you can wet the blade from time to time using a soap solution. As an alternative solution, you can use a device designed for cutting; it is also possible to use an electric jigsaw. On the latter you first need to attach a file with small teeth, the file must also be pre-moistened with water, during the work such manipulations must be done periodically.
The best homemade walk-behind tractors on tracks photo
Related Posts:
- How to make lugs for a walk-behind tractor with your own hands, photo description and dimensions
Motoblock Agros and homemade products for it
Making a homemade all-terrain vehicle from a walk-behind tractor photo, video Hitch to a walk-behind tractor with your own hands, photos, drawings
How to make a homemade gearbox for a walk-behind tractor, photos and drawings
Homemade potato digger for walk-behind tractor - photo, video
Homemade mower for walk-behind tractor (rotary, segmented)
Tracks seem to be, and may be, the most difficult component of a homemade tracked vehicle to manufacture. It doesn’t matter at all what you want to make tracks for - a small all-terrain vehicle for hunting, a motorized towing vehicle for fishing, or a crawler walk-behind tractor for housework. In all cases, you need a light and easy-to-manufacture homemade caterpillar, which would then serve for a long time and would not require close attention during operation.
Those who can afford to buy serial tracks in one of the online stores do it and don’t think twice about it. But for most skilled craftsmen, the budget for building equipment for home use does not allow this. Ingenuity or the Internet comes to their aid!
There are several ways to make them and one of the most common among garage craftsmen is to make tracks from car truck tires. Using a shoemaker's knife, periodically moistening it in a regular soap solution to make it slide more easily on the rubber, cut out the beads of the tire, leaving only the treadmill. It is only here in the article that this process can be described in one sentence. In fact, this is a very labor-intensive and traumatic job that requires patience and care. The result of this painstaking process will be a high-quality and not frayed cut.
For those who want faster results, there is another option - take a jigsaw with a fine file. Remember! Regardless of the cutting method you choose, the result always depends on you. One person can fiddle with a knife, injure himself and cut everything crookedly, while the other can do everything quickly and accurately with a jigsaw. It all depends on your skills, abilities and experience - choose a method based on them.
After you have cut out the beads of the tire, you need to check the resulting ring for elasticity and, if necessary, remove the excess inner layers of rubber. Next, you need to figure out whether the existing tread pattern is suitable for you, and if not, then cut a new one, because the tracks, depending on operating conditions, may require good lugs. Someone may need to regularly travel long distances along the highway and do not need to make changes, but fishermen and hunters driving through swamps and deep off-road could use good grip.
Homemade tracks made from car tires can be used on various equipment; they are quite reliable and inexpensive to manufacture. Of course, they have pros and cons, and in general, undoubtedly, everyone will have something to add to the described manufacturing process.
Video of a small tractor with homemade tracks from tires:
You can make amendments to the article or supplement it, as well as express your opinion, in the comments to it without registration.
In remote areas where it is necessary to travel long distances, fishermen and hunters need to have their own transport. Due to the high price, many today cannot purchase one and are trying to construct a homemade snowmobile with their own hands. It is not easy to build, but if you apply maximum patience and effort, this problem will not be difficult to cope with.
Caterpillars through the trenches
The tank drove just as effectively through complex large trenches. Where the armored car’s wheel would have stuck tightly, the long caterpillar managed to touch the other edge of the trench before the tank began to “nod off” and fall through. A reliable anti-tank ditch required a completely different number of working hours and equipment - and there just weren’t enough of them in that war.
The tank caterpillar won where the infantry failed.
Frame construction
Before you begin building a snowmobile, you will first need to select a material. The easiest way is to make a homemade frame from wooden blocks. The result is a very light and fairly durable structure, which is considered the cheapest and easiest to manufacture. For this you will need:
- Wooden bars.
- Sheet iron.
- Metal scissors.
- Drill and drill bits.
- Hand saw.
- Bolts and nuts.
The advantages of building such a structure are undeniable. In the event of a breakdown, the wooden model will not be difficult to repair far from a populated area. In the forest it is easy to find scrap materials that can be used for repairs. But the main advantage is that this snowmobile rarely falls through the ice and does not sink in water.
Wooden structure
It is known that bars and boards made of wood do not have particular strength in their places
connections. Therefore, before starting construction, it is necessary to make additional metal corners. To do this, take sheet iron and cut square plates with scissors along the width of the bars. The places for the bolts are marked in them with a tape measure, and then four holes are drilled with a drill. After this, the plates are bent in half exactly 90 degrees. These will be excellent devices for firmly fastening wooden blocks in the corners of a homemade frame.
Usually they start construction after making a drawing with exact dimensions. And four bars are cut along them with a hacksaw, and holes for bolts are drilled in the corners with a drill. Then they are placed on a flat floor surface in the form of a regular rectangle. Metal corners are applied to the connection points, bolts are inserted and tightened tightly with nuts.
To mount the engine and track, two additional crossbars made of bars with holes for bolts at the ends are installed on the frame. But before that, the corners for fastening are first made. They are cut out of triangular-shaped iron sheets and holes are drilled in the corners
.
It’s better to make eight pieces at once and place them on top and bottom. Then the fastenings will be more durable and reliable in operation.
When they are ready, the crossbars are inserted inside the frame and the triangles are placed on top. Holes are drilled into them exactly to size using a drill through the bars. Then long bolts are inserted there and tightened tightly with nuts. At this point, a strong wooden frame will be ready, which will serve for a long time on a homemade device.
It is much more difficult to build homemade metal products. This requires special tools and devices that not everyone may have. Significant costs will be required to purchase or rent them. However, this building will be much stronger and more durable than a wooden structure.
. Here you will need:
In addition, to build a metal frame you will need more durable materials. You will definitely have to buy them in the store, since today they are not found anywhere else. And I don’t really want to build a new homemade snowmobile from old parts due to poor reliability. Therefore, only good materials will be used here:
- Metal pipes.
- Iron corner.
- Sheet steel.
- Channel.
As a rule, before you start building a frame, you need to make a simple drawing. Using a grinder, cut the pipes according to its parameters and use a welding machine to connect them into a rectangle. Inside the frame, insert a couple more partitions from the corner to install the engine and track. If you make them from channel bars, the structure will be much stronger and more reliable in operation.
After this, you just need to cut off two small bushings from the metal pipe.
And then weld them to the corners of the front part, where the swivel ski supports will be inserted. The metal frame is ready and you can begin construction, as well as installation of the main units and components.
Finishing the job
Finally, about how to install it on a homemade snowmobile on tracks. In the process of assembling a snowmobile, it is necessary to make two rotary bushings. This will be your steering mechanism. How it's done? You need to weld a water coupling with a 1/3-inch internal thread to the front beam and screw the male threaded pipes into them. The pipes already have ski struts and welded bipods for the steering rod. By the way, you can use skis from an ordinary children's car "Argamak". But before that, first prepare them for installation: attach the corners of the rotary stand and trim the metal. This will significantly improve the maneuverability and control quality of the snowmobile at high speed.
In remote areas where it is necessary to travel long distances, fishermen and hunters need to have their own transport. Due to the high price, many today cannot purchase one and are trying to construct a homemade snowmobile with their own hands. It is not easy to build, but if you apply maximum patience and effort, this problem will not be difficult to cope with.
Hanging equipment
To make a snowmobile fast and strong, you need to put a good engine on the frame. If you install a low-power motor, then such a structure will move poorly. You also need to correctly calculate the caterpillar. If the area is too small, it will drown in large snow and will not pull even on flat terrain. Particular attention should be paid to skis, which should create good stability and safety when moving at high speed.
DIY rubber caterpillar
To easily move through the snow, it is very important to give your homemade snowmobile a good rubber track. It is not easy to make such a device with your own hands and it is better to purchase it in a store completely with rollers. Installing a standard factory track on a homemade structure is not difficult. To do this, you just have to secure the drive shaft and rollers with bearings to the frame. If your financial situation does not allow you to buy the entire device, then the most expensive parts can be easily made yourself. For this you will need:
- Conveyer belt.
- Plastic pipe.
- Bolts, washers and nuts.
A cheap homemade snowmobile track is usually made using a thin conveyor belt. To do this, plastic pipe blanks are sawed off to fit the width of the rollers. Then they are cut lengthwise into two equal parts and holes are drilled for small bolts. After this, the halves of the plastic pipes are secured to the conveyor belt with bolts, washers and nuts. The caterpillar is ready and further construction needs to begin.
.
Homemade skis
It's no secret that in winter it is much more convenient to travel on deep snow on skis. They also serve well as a control device on a snowmobile. It is not difficult to make a wooden structure, but only strong boards made of birch or oak are suitable for this. They need to be well dried, planed, and then heated and the ends bent. It's no more difficult to make metal skis. To do this, you will need to cut two plates from sheet steel and weld a thin corner on the sides.
In order for the skis to turn freely, metal pipe stands are welded to them. In working order, they are held in the front bushings of the frame, where they rotate easily
.
Washers or large nuts are welded to the top of the racks, into which rods are inserted to control the snowmobile.
The steering wheel itself is easy to make with your own hands, or it’s easier to remove it from an old motorcycle. Thus, all that remains is to install the motor, as well as the driver’s seat, and you can hit the road.
When operating in off-road conditions, tracked vehicles have undeniable advantages over wheeled vehicles.
due to its all-terrain qualities, allowing it to overcome deep loose snow, soggy arable land or rocky ford.
The popularity of tracked vehicles among household users is so great that many home craftsmen independently “convert” their wheeled vehicles into homemade ones - tracks made from scrap materials.
One of the retrofitting options is to use old tires from MTZ tractors, which can significantly increase cross-country ability
personal cars and motorcycles
at minimal financial costs
.
For a tracked vehicle of any purpose, be it a tank or a snowmobile, forward motion is provided by a tracked propulsion unit (CT).
It uses two motivating factors
:
- torque Mk, transmitted from the engine/power drive to the drive wheels;
- adhesion of tracks to the ground.
A caterpillar or caterpillar chain of a main engine is a link structure, which is a continuous continuous belt or chain.
For full traction with the ground surface, the caterpillar is equipped with raised protrusions
, serving as active lugs.
The caterpillar principle is illustrated by the kinematic diagram of the main engine operation located below. The following positions are indicated on the diagram:
- pos. 1 – caterpillar;
- pos. 2 – support rollers that prevent the track belt from sagging;
- pos. 3 – drive sprocket (drive wheel), which converts torque from the engine into traction force necessary for the forward movement of the machine;
- pos. 4 – support rollers, ensuring full contact of the track belt with the surface of the ground support;
- pos. 5 – shock absorbers;
- pos. 6 – guide wheel, which serves to direct the forward movement of the machine and transfers part of its weight to the ground.
Movement according to the caterpillar principle is carried out as follows
:
- Torque Mk is supplied to the drive sprocket (item 3).
- The rotating sprocket rewinds the continuous track belt/chain (item 2).
- The caterpillar (item 2) is in close adhesion to the support surface (soil, loose soil, etc.). It is affected by:
- force R z – reaction of the supporting surface, which the caterpillar transmits to the vehicle frame;
- tangential reaction of the ground support P k.
The rewindable track belt/chain is continuously laid in the direction of forward motion of the vehicle on the surface of the ground support under the road wheels, creating a path with lower resistance to movement
than on soft ground.
During movement, the caterpillar belt rises from the supporting surface and transfers the pushing force to the vehicle frame.
The specific pressure on the support (soil) along the length of the track is uneven - increased in the area of the drive sprockets, decreased in the front part in the area of the guide wheel (item 6). The maximum pressure on the ground from the main engine is in the area of the road wheels (item 4).
Modern caterpillars
On the same topic
Tanks - weapons of the past or the future?
Throughout the twentieth century there was a fierce struggle between industrialists and technologists for a durable, reliable tank track. New metals so that the caterpillar can live at least a thousand or two more kilometers. Cunning design of “fingers” - to quickly replace a broken track. Spikes, ridges and spurs for better movement on ice and liquid mud. Rubber and plastic inserts to reduce noise. Shock-absorbing pads to save roads in peacetime.
Wheeled tanks for small wars and police operations, of course, also exist - and new ones will appear. But truly protected combat vehicles for the harshest combat conditions will continue to use tracks.
Advantages of homemade diesel engines from MTZ tires
Thanks to the continuous placement of the caterpillar belt under the machine’s rollers during movement, a large contact area between the belt and the ground
, significantly reducing the average pressure of the machine on the soil.
The range of average pressure on the ground of equipment with deep pressure is from 11.8 to 118 kN/sq.m (from 0.12 to 1.2 kgf/sq.cm), which is significantly lower than the pressure of a human foot.
Such low pressure levels ensure that equipment is protected from sinking into the ground, swampy soil or snow. By varying the size of the surface area in the contact zone of the track with the support, an optimal ratio of the vehicle's cross-country ability with its traction force for towing cargo is achieved.
When equipping vehicles with caterpillar tracks, homemade DIYers use transport belts or tires from automobile and tractor wheels.
The photo below shows a homemade all-terrain vehicle
on tracks made of reinforced conveyor belt with a width of 250 mm. Grousers with a height of 25 mm are used.
All-terrain vehicle made from a conveyor belt:
For most craftsmen, the preferred source materials for the manufacture of diesel engines are old tires from MTZ tractors of various models.
The main advantages of MTZ tires, as a source material, and the tracks themselves made from these tires include the following factors:
- Availability
of old MTZ tires. Quite often, after dismantling, they are stored in the depths of the utility yards of enterprises, cluttering the territory. - The tire is a closed continuous structure and does not require sewing the ends
of the tape. - On a tracked platform made from tractor tires, there is no need to increase the lugs
, since the tires have a pronounced tread relief of the factory design. - MTZ wheel tires have high strength
and wear resistance, ensuring reliable, trouble-free operation of the caterpillar track on soils containing sharp stones. - Universality
of application - you can select tires for all types of tracked vehicles, including measures to modernize equipment or increase the width of tracks. - Recycling of used tractor tires solves the most important problem of recycling dismantled wheels - the possibility of their reuse.
Among the shortcomings
When working with tractor tires, two circumstances are noted:
- limited fixed track length, determined by the size of the tire blank;
- the need to double two tires when installing a track with a width exceeding the width of one blank tire.
Endless rails
The advent of railways also influenced the inventors of the caterpillar propulsion system. It is no coincidence that in such projects, of which there were many at that time, “endless rails” are mentioned. In 1770, the inventive Irish landowner Richard Lovel Edgeworth came up with the idea of supplementing the usual carriage with wooden portable rails - “a rolling road formed by wooden blocks carried by the cart and lined regularly in such a way that they always have contact with the ground sufficient for the movement of the cart.” Similar inventions were proposed by Thomas Jerdman (in 1801) and William Palmer (1812), and slightly different ones by John Richard Bury (1821) and George Cayley (1825). All of them were designed to facilitate the work of horses, since the carts on caterpillar tracks still had to be pulled by these animals.
Requirements for converting equipment to caterpillar tracks
The figure shows the simplest design
homemade cart with tracks made from tires.
The re-equipment of vehicles with diesel engines is carried out exclusively for utilitarian reasons of pragmatic owners of wheeled vehicles or motor vehicles who wish to improve all-terrain qualities
their "helpers".
For all models of equipment intended for driving in field conditions, the market offers serial versions of industrially manufactured diesel engines.
However, all this costs a lot of money, and tires are free or very cheap
.
Many equipment users manage to independently, in a home workshop, make tracks from tractor tires, install them on their vehicles and successfully operate them in off-road conditions
.
Regardless of the type of vehicle or motor vehicle, technicians take into account the following factors:
- To install hydraulic drive mechanisms, it is necessary to equip special frame structures
of increased strength and rigidity that can withstand increased weight and dynamic loads. - When using improvised means, many craftsmen use pneumatic wheels as tensioners
, as well as a pair of driving and driven wheels. The tape is put on the flat tires, which are then inflated, creating the required track tension. - The owner of the equipment must clearly determine the purpose of the machine in order to select the optimal dimensions for the width and length of the caterpillar track.
- Taking into account the increase in weight and traction loads on the engine after installation of the main engine, it is necessary to optimize the correspondence between the maximum engine power and the width of the track. Otherwise, the engine quickly fails
.
When choosing the ratio of engine power and belt width of a homemade tracked installation, you can be guided by price list data
on all-terrain vehicles equipped with serial tracks.
Below we will consider the categories of machines that are most popular among craftsmen when converting them to crawler tracks.
Steel structures
At the end of the 19th century, track inventors increasingly leaned toward steel structures. And here we should once again recall the Russian steam tractor designer Fedor Blinov. In his car, the track consisted of interchangeable steel tracks, the track made of upper links (rails) and lower links (sleepers, or shoes). In addition to the road wheels, the vehicle had two rear-mounted drive wheels, with cast-iron toothed rims that engaged the track on the link hinges. Each caterpillar was powered by a separate steam engine (with a single boiler), which made it possible to make turns by adjusting the rotation speed of one caterpillar.
In 1888, Blinov was the first to build and test a real machine of this type, regardless of foreign analogues. However, the practical application and mass production of tracked tractors, both in Russia and abroad, began only in the 20th century.
Main categories of popular equipment equipped with gas engines
The list of models of household vehicles and motorcycles operating on loose snow and marshy soils is unusually wide.
The names of the machines themselves, accepted in everyday life, indicate their field of application.
Snowmobiles
This is a vehicle designed to travel on loose snow cover.
.
Unlike the anglicism “snowmobile”, which denotes any vehicle adapted for movement on snow (snowmobiles, all-terrain vehicles on tracks and pneumatic wheels, etc.), in Russia only ski-tracked vehicles
(rear main engine, in front - skis instead of the front wheel) with motorcycle-type controls.
For utilitarian snowmobiles, the engine power is 30-40 hp, the track width ranges from 38 cm to 50 cm and even 60 cm.
Accordingly, if a master sets his task to create a machine for moving on virgin snow with a load, then he should focus on these indicators.
Similar parameters must be maintained when creating so-called snow and swamp-going vehicles.
If the master needs to make a faster snowmobile
(like sports ones), then the width of the tire track can be reduced.
The weight loads of a high-speed vehicle are much lower than those of a cargo utility vehicle.
The picture shows a motorcycle-based snowmobile equipped with a homemade 23 cm wide track cut from an excavator tire.
Otherwise, a homemade snowmobile track is made with your own hands according to the basic principle.
All-terrain vehicles
In everyday life, they include any vehicle capable of moving off-road.
and even overcome water obstacles.
There are plenty of varieties of industrial all-terrain vehicles:
- SUVs;
- swamp walkers;
- amphibians;
- tracked tractors and conveyors;
- ATVs;
- ATV category vehicles, etc.
The cost is not affordable for everyone
, therefore, in home workshops they prefer to create their own exclusive products, “re-shoeing” their cars with tracks from tires made by themselves for an all-terrain vehicle.
Depending on the engine power of the vehicle, wider blades can be allowed.
For homemade all-terrain vehicles with a 40-70 hp engine. and a small weight load, a tape 30-40 cm
.
For vehicles based on UAZ vehicles with an engine of 110-150 hp. 40 cm wide track required
with support rollers (6 pcs.) and support rollers (3 pcs.).
Naturally, to overcome a water obstacle, the profile height of a tractor tire will not be enough; it is necessary to install high lugs
.
The figure shows an all-terrain vehicle based on the Oka vehicle with a caterpillar track made of tires.
Walk-behind tractors
Represented by numerous mobile devices based on a single-axis chassis
. Home-made versions of walk-behind tractors converted for diesel engines are widely in demand among rural residents and owners of country houses or summer cottages.
The motivation for independently re-equipping units, bypassing the purchase of serial tracks, is obvious.
The cost of a NEVA wheeled walk-behind tractor does not exceed $1000
.
USA, while the simplest cars, adapted for driving on snow, are estimated at 5-10 thousand dollars
. and higher.
The drive power of the walk-behind tractor (5-8 hp) is quite enough to be successfully used as an all-season vehicle
Motorcycle dogs
Motorized towing vehicles, nicknamed motorized dogs in everyday speech, are a mechanical coupling of a sled with a towing vehicle on a main engine. The driver and cargo are placed in the sleigh.
Serial models are produced in a wide range of drive power (from 6 to 30 hp) and are equipped with a motor made of rubber-metal tape up to 60 cm wide.
Home craftsmen usually make towing vehicles based on a 15 hp engine from improvised means, installing tracks from 500 mm wide
.
Such homemade motorized dogs are capable of transporting sleds with a load of up to 700 kg, reaching speeds of up to 40-50 km/h.
Most often, a homemade caterpillar for a motorized dog is made from a tire to save money.
The photo shows a homemade motorized towing vehicle based on a walk-behind tractor.
LiveInternetLiveInternet
Quote from Vetic
Read in full In your quotation book or community!
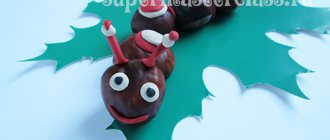
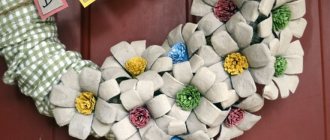
Fleece caterpillar
I saw a photograph of a toy caterpillar in a Japanese craft magazine. She looked so bright and positive that I couldn’t resist and went to the store to buy fleece. I really wanted to sew such a caterpillar for my close friend’s son!
If you like this cute, friendly creature, I will tell you in detail about all the stages of its creation.
First of all, I cut out the pattern for the caterpillar head (the final segment of the body is sewn using the same pattern) and stitched the darts.
Then I decided on the height of the horns, cut them out of fabric, turned them inside out and stuffed them with padding polyester.
I secured the horns to the front side of the head fabric with pins and sewed two segments of the back of the head along the contour of the pattern.
I used grosgrain ribbon as the loop to which the torso will be attached. Subsequently, a fastener will be attached to the loop, so it is very important that the material chosen for it is durable and does not stretch. It will be subject to heavy loads. The loop should be sewn into the center of the opening to be turned inside out. The size of the loop is arbitrary, it is selected experimentally.
This is what the caterpillar head looks like.
And this is the final segment of the body.
I decided that it would be more convenient if the caterpillar body segments were put on with a wide elastic band. The elastic stretches and compresses well. The effect of its compression will serve well in holding the rings of the caterpillar body together. The fleecy surface of the fleece will not allow the rings to slide, and the elastic band will tightly press the segments to each other and will not allow them to fall apart in different directions. The body will look united and whole.
To make it pleasant for the baby to hold the elastic band in his hands, I lined it with fleece. It was decided to use buttons for fastening. They are quite durable and reliable. In addition, buttons are easier and faster for a child to fasten than buttons or hooks.
So that the caterpillar's facial expression would constantly change, I decided to go with plastic eyes with moving pupils. The eyes are glued on, and the blush and mouth are securely sewn on.
In the process of sewing the ring segments together, I encountered unexpected difficulties that I had to overcome experimentally. The difficulty was to keep the segment round in shape even after stuffing, despite the ability of the fleece to stretch in different directions. And also avoid unnecessary seams, which also tighten the fleece. After trying several options, I settled on the following.
Prepare the caterpillar legs in advance in the same color as the ring to which they will be sewn. Decide in which direction the fleece stretches. It is very important to make all ring patterns in such a way as to keep the direction of stretching the material the same, otherwise the finished rings will skew in different directions.
Cut one ring from the fabric with a hole in the center (same as on the pattern). Place the paws on the right side of the fabric. After trying several different options, I determined that the best distance between the legs was 12 cm and maintained this on all rings. Secure the paws to the fabric with pins. Cut out the second ring, but without the center hole. Place the pattern face down on the first circle with legs. Sew both circles completely along the outer outer edge.
Turn the workpiece out through the central hole.
Using a fabric marker, trace the outline of the central hole on the second circle and cut it out.
Mark with pins the segment through which you will stuff the workpiece and sew the outline of the inner circle with a blind stitch.
Fill the workpiece tightly with filler and sew up the remaining hole.
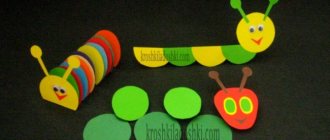
Prepare several rings of different colors.
It seemed to me that for a given track size (taking into account the slight compression of the rings by the rubber band), 8 rings would be most suitable.
All that remains is to assemble the caterpillar. One end of the elastic is fastened to the final segment. All subsequent rings are put on it in random order.
There are no bells in the paws. I think padding made of padding polyester would muffle their chime. But thinking about the bells, I suddenly thought that you could fill the paws with something like granules, buckwheat or other cereal. Children love to feel everything. Let's fasten the head and the game can begin!
Thanks to the loose segments, the caterpillar's body can wriggle.
This cute creature will become more than just a kind and soft toy for your baby. The caterpillar is fun to recognize colors, determine their sequence, and change the order of colorful rings. You can try to count them, learn the parts of the caterpillar's body and come up with many other fun games.
If you liked the caterpillar as much as I did, I offer you a pattern that I borrowed from a Japanese magazine and slightly modified to obtain smoother and rounder rings.
Recently the caterpillar met its new owner. His name is Syoma, he is one and a half years old. Syoma gave the caterpillar a real test of strength and showed us how else we could use the new soft toy for play.
It's great to pull her horns in different directions! (Be careful in stitching the attachment points of the legs and horns, children love to pull on everything they can).
It's great to crawl around with a caterpillar!
It also makes a very soft pillow! You can lie on the floor, sing songs or dream!
Did you know that caterpillar rings are a lot of fun to put on your wrists? They are so soft and warm! The most real colored bracelets!
What if you try to put them on your feet? It's so fun to swing your legs and pull on little legs!
And running with ankle bracelets is even more fun!
What if you put one segment on the floor, lie on it with your head and roll on the parquet using your feet? They did not expect? Funny!!!
That's how much fun one caterpillar can bring to a child! And they just met! What will happen when Syoma and the caterpillar become real friends?
I hope they will delight each other with new discoveries and achievements!
Algorithm for making a caterpillar belt with your own hands
The caterpillar track for any model from the above categories of equipment is made from tires of various sizes corresponding to the selected design. Let's look at how to make a caterpillar from a tire step by step.
The work on tape production is unified and follows a general algorithm.
Special knowledge is not required when making a caterpillar from a tractor or car tire, but you cannot do without certain metalworking skills
.
The process of forming a caterpillar track from an MTZ tire consists of several stages:
- Select a tire with a slightly worn tread.
- The track
for the caterpillar is cut using a sharpened shoe knife. Working with a sharp knife is dangerous and requires increased caution and attention. - To make rubber cut better, it is recommended to periodically moisten the knife with soapy water
. - Cutting with a knife can be successfully replaced with a jigsaw
, protecting against possible injury. - Both sidewalls
of the tire are cut off. - Excess material is removed from inside the tire.
The criterion for quality work is an even cut without frayed edges of the resulting tape.
.
So the track element is ready to use:
Stage three
Assembling the body of the caterpillar. For the legs I used knitwear, but you can use the same fleece. We cut out rectangles of the desired length and width, stitch along the long edge and turn them inside out. We fold the parts of the shoes in pairs with the right sides inward and stitch them, leaving the top open. We turn it inside out, stuff it, insert the leg and sew it with a hidden seam. We stuff the leg itself. If you want the legs to be harder and the caterpillar to stand, make them shorter, denser and thicker.
We fold the parts in the form of rings in pairs with the inside out, and insert the paws between them so that after turning them inside out they are on the outside and sew them together in a large circle. Turn it inside out. Now we sew up a little more than half of the inner circle with hidden stitches, stuff the ring and sew up the remaining hole. The body segment of our caterpillar is ready. There can be as many of them as the mother has enough patience.